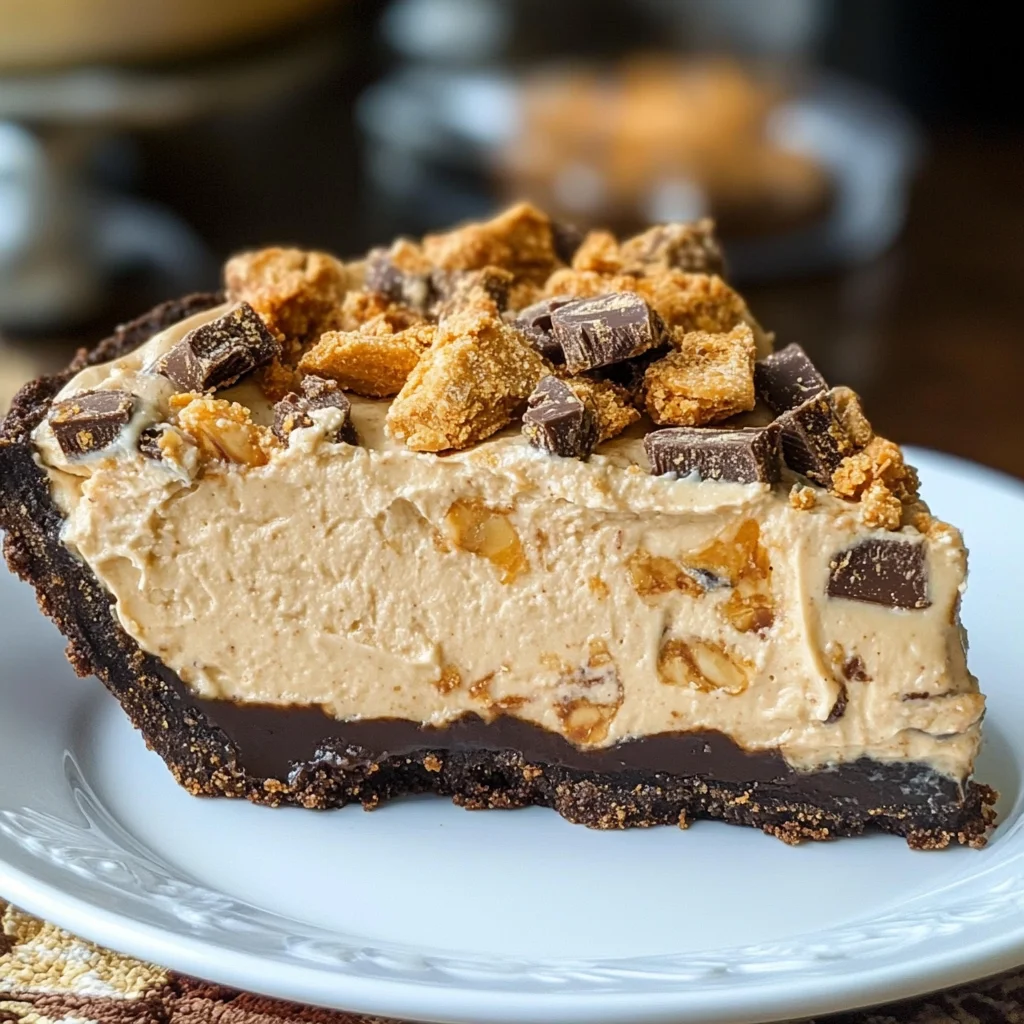
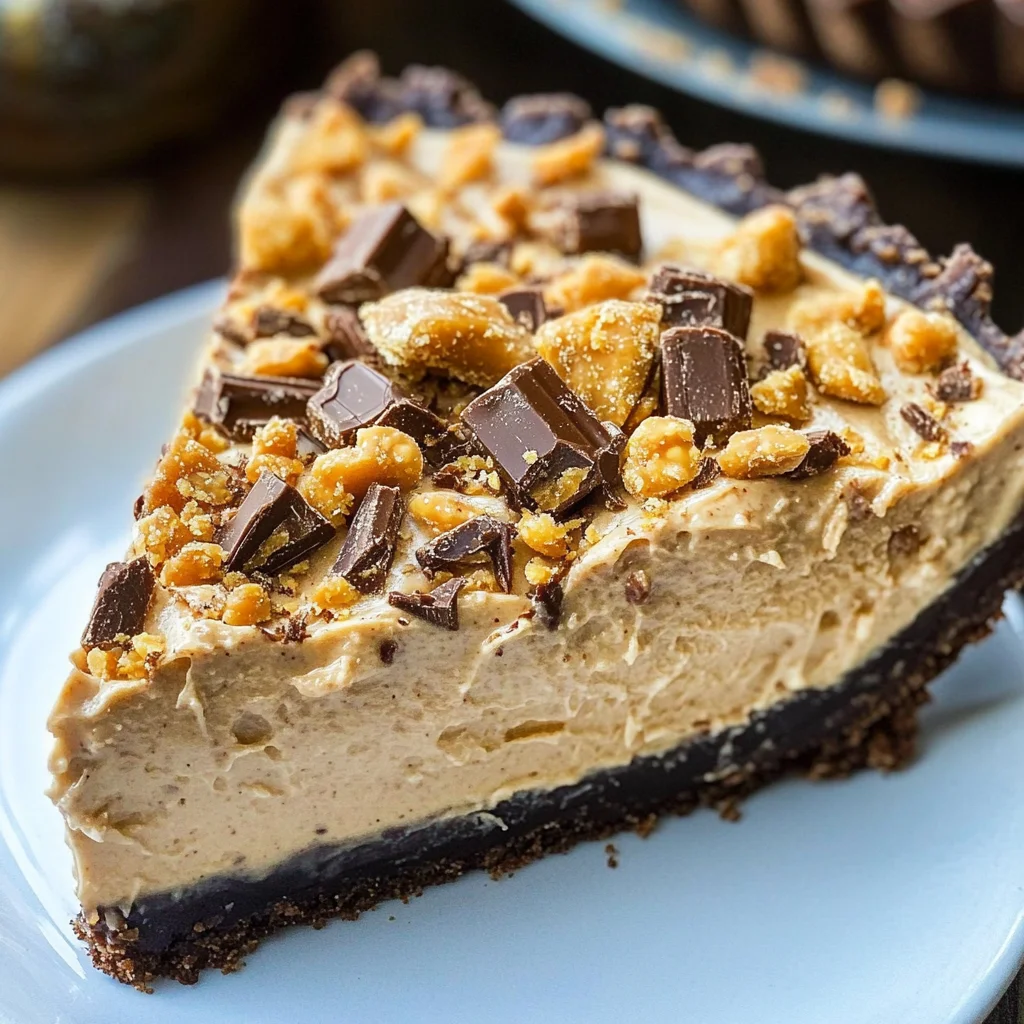
This cool and creamy Butterfinger Pie is the stuff dreams are made of. It’s a no-bake dessert that’s so easy to make and perfect for any occasion. Whether you’re hosting a summer barbecue or celebrating a birthday, this pie is sure to impress. Its combination of rich peanut butter, cream cheese, and crunchy Butterfinger bars creates an unforgettable flavor that your guests will love.
Jump to:
- Why You’ll Love This Recipe
- Tools and Preparation
- Essential Tools and Equipment
- Importance of Each Tool
- Ingredients
- For the Filling
- For the Crust
- How to Make Butterfinger Pie
- Step 1: Combine Cream Cheese and Peanut Butter
- Step 2: Mix in Powdered Sugar
- Step 3: Fold in Crushed Butterfingers
- Step 4: Incorporate Cool Whip
- Step 5: Assemble the Pie
- Step 6: Chill Before Serving
- How to Serve Butterfinger Pie
- Classic Serving
- Topping Variations
- Pairing Suggestions
- Fun Presentation Ideas
- How to Perfect Butterfinger Pie
- Best Side Dishes for Butterfinger Pie
- Common Mistakes to Avoid
- Storage & Reheating Instructions
- Refrigerator Storage
- Freezing Butterfinger Pie
- Reheating Butterfinger Pie
- Frequently Asked Questions
- What is Butterfinger Pie?
- How do I customize my Butterfinger Pie?
- Can I make Butterfinger Pie ahead of time?
- Is there a gluten-free option for Butterfinger Pie?
- Final Thoughts
- 📖 Recipe Card
Why You’ll Love This Recipe
- Easy to Prepare: With just 15 minutes of prep time, you can whip up this delicious dessert without any fuss.
- No Baking Required: Enjoy a sweet treat without the heat of the oven—perfect for warm days!
- Crowd-Pleasing Flavor: The combination of peanut butter and Butterfinger bars makes this pie irresistible to both kids and adults.
- Versatile Dessert: Ideal for parties, potlucks, or simply treating yourself after a long day.
- No Special Skills Needed: Even novice bakers can successfully create this delightful dish with ease.
Tools and Preparation
Before diving into making your Butterfinger Pie, gather your tools and equipment. Having everything ready makes the process smooth and enjoyable.
Essential Tools and Equipment
- Mixing bowl
- Electric mixer
- Rubber spatula
- Measuring cups
- Measuring spoons
- Refrigerator
Importance of Each Tool
- Mixing bowl: A sturdy bowl helps combine ingredients thoroughly without spills.
- Electric mixer: Ensures smooth mixing quickly, giving you the perfect texture without effort.
- Rubber spatula: Great for folding in delicate ingredients like Cool Whip without deflating them.
Ingredients
For the Filling
- 1 (8-ounce) package cream cheese (room temperature)
- 1/2 cup creamy peanut butter
- 2 teaspoons vanilla extract
- 1 1/2 cups powdered sugar
- 1 (12.5-ounce) bag fun-sized butterfinger bars (crushed; reserve 2 bars to sprinkle on top)
- 1 (8-ounce) container Cool Whip (thawed)
For the Crust
- 1 store-bought oreo or chocolate graham cracker crust
How to Make Butterfinger Pie
Step 1: Combine Cream Cheese and Peanut Butter
- Place cream cheese and peanut butter in a large mixing bowl.
- Add vanilla extract.
- Beat with an electric mixer until smooth.
Step 2: Mix in Powdered Sugar
- Gradually add powdered sugar to the mixture.
- Continue beating until fully combined and smooth.
Step 3: Fold in Crushed Butterfingers
- Gently fold in the crushed Butterfinger bars to maintain their crunchiness.
Step 4: Incorporate Cool Whip
- Carefully fold in the Cool Whip until well combined, ensuring not to deflate it.
Step 5: Assemble the Pie
- Spread the filling evenly into the store-bought crust.
- Sprinkle reserved crushed Butterfingers on top for added texture.
Step 6: Chill Before Serving
- Refrigerate the pie for at least 4 hours before serving to allow it to set properly.
Now you have a delightful Butterfinger Pie ready to impress! Enjoy every creamy bite!
How to Serve Butterfinger Pie
Butterfinger Pie is a delightful dessert that can be enjoyed in various ways. Whether you’re hosting a party or enjoying a quiet evening at home, here are some serving suggestions to enhance your experience.
Classic Serving
- Slice and Share: Cut the pie into wedges and serve on dessert plates for a classic presentation.
Topping Variations
- Chocolate Drizzle: Drizzle warm chocolate sauce over each slice for an extra indulgent touch.
- Whipped Cream: Add a dollop of whipped cream on top for added creaminess.
Pairing Suggestions
- Vanilla Ice Cream: Serve with a scoop of vanilla ice cream to balance the richness of the pie.
- Coffee: A hot cup of coffee complements the sweet flavors beautifully.
Fun Presentation Ideas
- Garnish with Peanuts: Sprinkle crushed peanuts around the pie for added texture and flavor.
- Mini Cups: Serve individual portions in small cups for easy sharing at parties.
How to Perfect Butterfinger Pie
To ensure your Butterfinger Pie turns out perfectly every time, consider these helpful tips.
- Use Room Temperature Ingredients: Ensure your cream cheese is at room temperature for easier mixing and a smoother filling.
- Don’t Overmix: When combining ingredients, mix just until combined to maintain the lightness from the Cool Whip.
- Crush Butterfingers Well: For even distribution in the filling, crush your Butterfinger bars into small but not powdered pieces.
- Chill Thoroughly: Allow the pie to chill for at least four hours before serving to let it set properly.
Best Side Dishes for Butterfinger Pie
While Butterfinger Pie is rich enough on its own, pairing it with complementary side dishes can elevate your dessert experience. Here are some great options.
- Fresh Fruit Salad: A mix of seasonal fruits brings freshness and balances the sweetness of the pie.
- Chocolate Chip Cookies: Classic cookies add a crunchy texture that pairs well with the creamy pie.
- Nutty Granola Bars: Chewy granola bars provide a wholesome contrast, making them a great snack alongside dessert.
- Cheesecake Bites: Mini cheesecake bites offer a different type of creamy indulgence that complements the flavors of Butterfinger Pie.
- Peanut Butter Cup Brownies: Rich and fudgy brownies packed with peanut butter echo the flavors of your pie delightfully.
- Coffee Cake Muffins: Soft muffins with a crumbly topping are perfect for breakfast or brunch alongside your dessert.
Common Mistakes to Avoid
Making Butterfinger Pie can be easy, but there are a few common mistakes to watch for.
- Skipping the cream cheese softening: Using cold cream cheese will lead to lumps in your filling. Be sure to let it sit at room temperature for at least 30 minutes before mixing.
- Over-mixing the filling: While you want everything combined, over-mixing can make the pie too dense. Mix just until smooth and creamy.
- Not crushing Butterfingers properly: If the Butterfingers are not crushed well, they won’t distribute evenly. Use a rolling pin or food processor for uniform pieces.
- Under-refrigerating the pie: Cutting into the pie too soon can result in a messy slice. Allow it to chill for at least 4 hours to set properly.
- Using the wrong crust: A chocolate crust complements the flavors of Butterfinger Pie best. Avoid using a plain graham cracker crust for a less flavorful experience.
Storage & Reheating Instructions
Refrigerator Storage
- Store any leftover Butterfinger Pie in an airtight container.
- The pie will last up to 5 days in the refrigerator.
Freezing Butterfinger Pie
- You can freeze Butterfinger Pie for up to 2 months.
- Wrap it tightly with plastic wrap and then aluminum foil to prevent freezer burn.
Reheating Butterfinger Pie
- Oven: Not recommended as this pie is best served chilled.
- Microwave: If you’ve frozen slices, microwave on low power for about 15-20 seconds until slightly softened.
- Stovetop: Again, not applicable for this pie as it’s meant to be enjoyed cold.
Frequently Asked Questions
What is Butterfinger Pie?
Butterfinger Pie is a no-bake dessert made with cream cheese, peanut butter, and crushed Butterfinger bars, all mixed together and set in a chocolate crust.
How do I customize my Butterfinger Pie?
You can add chopped peanuts or drizzle chocolate sauce on top for extra flavor. Swapping out creamy peanut butter for crunchy adds texture too!
Can I make Butterfinger Pie ahead of time?
Yes! This dessert is perfect for making ahead. Just prepare it a day before serving and keep it refrigerated.
Is there a gluten-free option for Butterfinger Pie?
Absolutely! Use a gluten-free chocolate crust instead of traditional Oreo or graham cracker crusts for a delicious gluten-free dessert.
Final Thoughts
This cool and creamy Butterfinger Pie is truly delightful. Its rich flavors and easy preparation make it perfect for any gathering or sweet treat at home. Feel free to get creative with toppings or mix-ins, and enjoy every slice!
Did You Enjoy Making This Recipe? Please rate this recipe with ⭐⭐⭐⭐⭐ or leave a comment.
📖 Recipe Card
Print
Butterfinger Pie
- Total Time: 0 hours
- Yield: Serves 8
Description
Indulge in the delightful taste of Butterfinger Pie, a no-bake dessert that combines creamy peanut butter and rich cream cheese with crunchy Butterfinger bars. This easy-to-make pie is perfect for any occasion—be it a summer barbecue or a birthday celebration. With just 15 minutes of prep time, you can create an impressive treat that’s sure to satisfy both kids and adults alike. Serve it chilled for a refreshing dessert experience, and don’t forget to add some fun toppings like chocolate drizzle or whipped cream for an extra touch of indulgence!
Ingredients
- 8 ounces cream cheese (room temperature)
- ½ cup creamy peanut butter
- 2 teaspoons vanilla extract
- 1½ cups powdered sugar
- 12.5 ounces fun-sized Butterfinger bars (crushed; reserve 2 bars for topping)
- 8 ounces Cool Whip (thawed)
- 1 store-bought Oreo or chocolate graham cracker crust
Instructions
- In a mixing bowl, combine cream cheese, peanut butter, and vanilla extract. Beat until smooth.
- Gradually mix in powdered sugar until fully combined.
- Gently fold in crushed Butterfinger bars.
- Carefully add Cool Whip until incorporated without deflating.
- Spread the filling into the crust and sprinkle reserved Butterfinger bars on top.
- Chill in the refrigerator for at least 4 hours before serving.
- Prep Time: 15 minutes
- Cook Time: None
- Category: Dessert
- Method: No-bake
- Cuisine: American
Nutrition
- Serving Size: 1 slice (approximately 105g)
- Calories: 320
- Sugar: 23g
- Sodium: 290mg
- Fat: 20g
- Saturated Fat: 8g
- Unsaturated Fat: 10g
- Trans Fat: 0g
- Carbohydrates: 32g
- Fiber: 1g
- Protein: 5g
- Cholesterol: 30mg