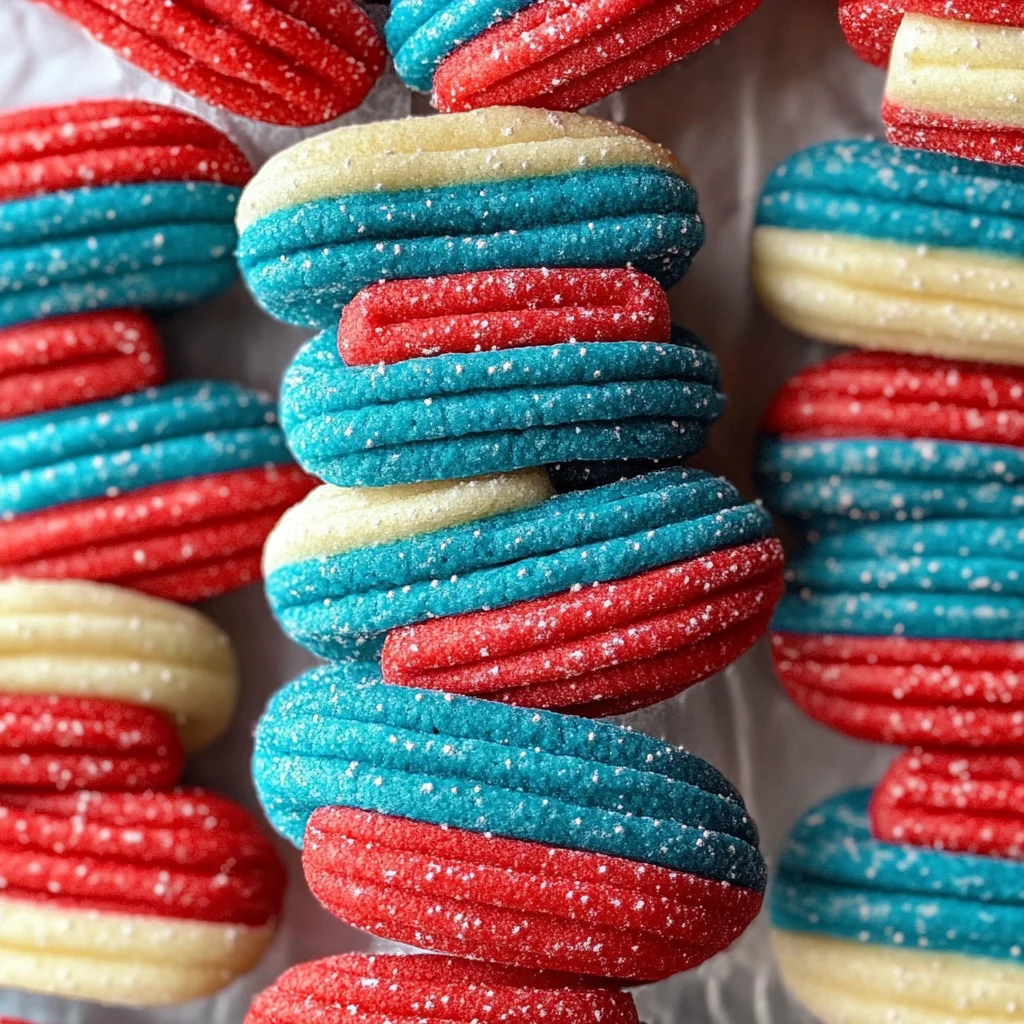
The Bomb Pop Cookies are a festive and colorful treat that captures the essence of summer fun. Perfect for potlucks, barbecues, or any celebration, these cookies mimic the iconic Bomb Pop ice cream. With their vibrant colors and delightful flavors, they are sure to impress both kids and adults alike. The combination of cherry, raspberry, and lemon extracts gives them a unique taste that’s hard to resist!
Jump to:
- Why You’ll Love This Recipe
- Tools and Preparation
- Essential Tools and Equipment
- Importance of Each Tool
- Ingredients
- For the Dough
- For Coloring and Flavoring
- How to Make Bomb Pop Cookies
- Step 1: Cream the Butter and Sugars
- Step 2: Prepare Dry Ingredients
- Step 3: Color the Dough
- Step 4: Shape the Dough Logs
- Step 5: Preheat Oven & Slice Cookies
- Step 6: Bake Your Cookies
- How to Serve Bomb Pop Cookies
- With Ice Cream
- At a Party
- As Favors
- With Beverages
- How to Perfect Bomb Pop Cookies
- Best Side Dishes for Bomb Pop Cookies
- Common Mistakes to Avoid
- Storage & Reheating Instructions
- Refrigerator Storage
- Freezing Bomb Pop Cookies
- Reheating Bomb Pop Cookies
- Frequently Asked Questions
- Can I customize the flavors of Bomb Pop Cookies?
- How long does it take to prepare Bomb Pop Cookies?
- Can I make these Bomb Pop Cookies gluten-free?
- What occasions are best for serving Bomb Pop Cookies?
- Final Thoughts
- 📖 Recipe Card
Why You’ll Love This Recipe
- Colorful Presentation: The vibrant red, white, and blue hues make these cookies visually appealing for any gathering.
- Delicious Flavor: The blend of cherry, raspberry, and lemon extracts creates a refreshing taste that stands out.
- Easy to Make: With simple steps, anyone can whip up these delightful cookies without hassle.
- Versatile Treat: Ideal for various occasions from Fourth of July celebrations to birthday parties.
- Fun for Kids: Involve children in the preparation process; they will enjoy shaping and decorating their own cookies.
Tools and Preparation
Before diving into baking your Bomb Pop Cookies, gather the necessary tools to ensure a smooth preparation process.
Essential Tools and Equipment
- Parchment paper
- Mixing bowls
- Electric mixer
- Measuring cups
- Baking sheets
- Plastic wrap
Importance of Each Tool
- Parchment paper: Prevents sticking and makes for easy cleanup on your baking sheets.
- Electric mixer: Saves time and effort when creaming butter and sugars until fluffy.
- Measuring cups: Ensures precise measurements for perfect cookie consistency.
Ingredients
For the Dough
- 1/2 cup butter, softened
- 1/2 cup confectioners’ sugar
- 1/2 cup sugar
- 1 large egg, room temperature
- 1/3 cup canola oil
- 2-3/4 to 3 cups all-purpose flour
- 1/2 teaspoon baking soda
- 1/2 teaspoon cream of tartar
- 1/4 teaspoon salt
For Coloring and Flavoring
- Red and blue paste food coloring
- 1/2 teaspoon each cherry, raspberry and lemon extract
How to Make Bomb Pop Cookies
Step 1: Cream the Butter and Sugars
Cream the softened butter with the confectioners’ sugar and granulated sugar until light and fluffy, about 5–7 minutes. Then add in the egg and canola oil, mixing well until fully combined.
Step 2: Prepare Dry Ingredients
In another bowl, whisk together 2–3/4 cups of all-purpose flour with baking soda, cream of tartar, and salt. Gradually incorporate this dry mixture into the creamed mixture. Add additional flour if necessary until a dough forms.
Step 3: Color the Dough
Divide the dough into three equal portions. Color one portion with red food coloring and cherry extract. Color another portion with blue food coloring and raspberry extract. Leave the last portion untinted but add lemon extract.
Step 4: Shape the Dough Logs
Shape each colored dough portion into a 10-inch long log. Place the red, white (untinted), and blue logs side by side. Lightly press them together before wrapping in plastic wrap. Refrigerate for about 30 minutes until firm.
Step 5: Preheat Oven & Slice Cookies
Preheat your oven to 350°F (175°C). Unwrap the chilled dough logs and slice them crosswise into 1/4-inch thick cookies. Arrange them at least 1 inch apart on parchment-lined baking sheets.
Step 6: Bake Your Cookies
To create ridges on top of each cookie, gently press down with a fork. Bake in your preheated oven for about 10–12 minutes or until set. Allow them to cool on the pans for 2 minutes before transferring them to wire racks to cool completely.
Enjoy your delicious Bomb Pop Cookies!
How to Serve Bomb Pop Cookies
Bomb Pop Cookies are a delightful treat that can be enjoyed in many ways. Whether you’re celebrating the Fourth of July or simply looking for a fun dessert, these cookies will impress your guests. Here are some serving suggestions to elevate your cookie experience.
With Ice Cream
- Scoop it Up: Pair each cookie with a scoop of vanilla or cherry ice cream for a delicious contrast.
- Ice Cream Sandwiches: Place a scoop between two cookies for a fun, handheld dessert.
At a Party
- Dessert Platter: Arrange the cookies on a colorful platter alongside other festive treats.
- Cookie Bar: Set up a DIY cookie bar with toppings like sprinkles and whipped cream for guests to customize their cookies.
As Favors
- Party Favors: Wrap individual cookies in cellophane bags tied with red, white, and blue ribbons for an adorable take-home gift.
- Picnic Treats: Pack them in lunchboxes for a sweet addition to any picnic spread.
With Beverages
- Milk Pairing: Serve with cold milk or chocolate milk for a classic combination.
- Lemonade Match: These cookies go perfectly with refreshing lemonade, especially during summer gatherings.

How to Perfect Bomb Pop Cookies
To ensure your Bomb Pop Cookies turn out just right, follow these helpful tips. Each step plays an important role in achieving that perfect taste and texture.
- Chill the Dough: Refrigerating the dough helps maintain its shape while baking.
- Use Room Temperature Ingredients: Ensure your egg and butter are at room temperature for better mixing and fluffiness.
- Don’t Overmix: Mix just until combined to keep the cookies tender.
- Check Oven Temperature: Use an oven thermometer; even slight variations can affect baking time.
- Press Gently: When creating ridges with a fork, press lightly to avoid flattening the cookie too much.
- Cool Properly: Allow cookies to cool on the pan briefly before transferring them to wire racks to fully set.
Best Side Dishes for Bomb Pop Cookies
Pairing side dishes with Bomb Pop Cookies can enhance your dessert experience. Here’s a list of tasty options that complement these colorful treats well.
- Fruit Salad: A refreshing fruit salad adds a light balance to the sweetness of the cookies.
- Chocolate Fondue: Serve warm chocolate fondue as a dip for an indulgent twist on dessert.
- Cheese Platter: A mix of cheeses can provide savory contrasts that work well with sweet flavors.
- Vanilla Yogurt Parfaits: Layer yogurt with granola and berries for a nutritious option alongside your cookies.
- Mini Cupcakes: Offer bite-sized cupcakes as another sweet treat that matches the festive theme.
- Popsicles: The coolness of popsicles is perfect during hot days and pairs well with the playful nature of Bomb Pop Cookies.
- S’mores Dip: A gooey s’mores dip is both interactive and delicious, making it a fun addition to any gathering.
- Veggie Tray: For something healthier, include fresh veggies with dip to balance out all the sweetness.
Common Mistakes to Avoid
Making Bomb Pop Cookies can be fun and easy, but there are a few common mistakes you should steer clear of.
- Incorrect butter temperature: Using cold butter can lead to dense cookies. Always use softened butter for the best texture.
- Overmixing the dough: Mixing too long can activate gluten, making cookies tough. Mix just until the ingredients are combined.
- Skipping chilling time: Not chilling the dough can cause cookies to spread too much while baking. Always refrigerate the dough as instructed.
- Not measuring flour correctly: Too much flour can make cookies dry. Use the spoon-and-level method for accurate measurement.
- Ignoring oven temperature: Baking at the wrong temperature can lead to undercooked or burnt cookies. Always preheat your oven properly.
Storage & Reheating Instructions
Refrigerator Storage
- Store Bomb Pop Cookies in an airtight container.
- They will last up to one week in the refrigerator.
Freezing Bomb Pop Cookies
- Wrap individual cookies in plastic wrap before placing them in a freezer-safe container.
- They can be frozen for up to three months.
Reheating Bomb Pop Cookies
- Oven: Preheat to 350°F (175°C) and warm cookies for 5-7 minutes.
- Microwave: Heat one cookie at a time for about 10-15 seconds until warm.
- Stovetop: Place a cookie in a pan over low heat, flipping occasionally for even warming.
Frequently Asked Questions
If you’re curious about Bomb Pop Cookies, here are some frequently asked questions that might help you out.
Can I customize the flavors of Bomb Pop Cookies?
Absolutely! You can swap out extracts or food coloring to create different flavor profiles and colors.
How long does it take to prepare Bomb Pop Cookies?
The total time is about 40 minutes, which includes both prep and baking time.
Can I make these Bomb Pop Cookies gluten-free?
Yes! Substitute all-purpose flour with a gluten-free blend for delicious results.
What occasions are best for serving Bomb Pop Cookies?
These festive cookies are perfect for summer gatherings, potlucks, and holiday celebrations like Independence Day!
Final Thoughts
Bomb Pop Cookies are not only visually appealing but also deliciously versatile. With their vibrant colors and delightful flavors, they make a perfect treat for any occasion. Feel free to customize them according to your taste preferences, ensuring that every batch is unique and enjoyable!
Did You Enjoy Making This Recipe? Please rate this recipe with ⭐⭐⭐⭐⭐ or leave a comment.
📖 Recipe Card
Print
Bomb Pop Cookies
- Total Time: 32 minutes
- Yield: Approximately 24 cookies 1x
Description
Bomb Pop Cookies are a festive, colorful treat that captures the essence of summer fun. Inspired by the iconic Bomb Pop ice cream, these cookies feature vibrant red, white, and blue hues and a delightful blend of cherry, raspberry, and lemon flavors. Perfect for potlucks, barbecues, or any celebration, these easy-to-make cookies will surely impress both kids and adults alike. Whether you’re serving them at a Fourth of July gathering or as a fun dessert for a birthday party, Bomb Pop Cookies are sure to be a hit!
Ingredients
- 1/2 cup butter (softened)
- 1/2 cup confectioners' sugar
- 1/2 cup granulated sugar
- 1 large egg (room temperature)
- 1/3 cup canola oil
- 2–3/4 to 3 cups all-purpose flour
- 1/2 teaspoon baking soda
- 1/2 teaspoon cream of tartar
- 1/4 teaspoon salt
- Red and blue paste food coloring
- 1/2 teaspoon each cherry, raspberry, and lemon extract
Instructions
- Cream together softened butter with confectioners' sugar and granulated sugar until light and fluffy. Add egg and canola oil; mix until combined.
- In a separate bowl, whisk together flour, baking soda, cream of tartar, and salt. Gradually add this mixture to the creamed mixture until a dough forms.
- Divide the dough into three equal portions; color one red with cherry extract, another blue with raspberry extract, and leave the last untinted but add lemon extract.
- Shape each portion into a log; refrigerate for about 30 minutes until firm.
- Preheat oven to 350°F (175°C). Slice logs into 1/4-inch thick cookies and place on parchment-lined baking sheets.
- Bake for 10–12 minutes or until set; cool on wire racks.
- Prep Time: 20 minutes
- Cook Time: 12 minutes
- Category: Dessert
- Method: Baking
- Cuisine: American
Nutrition
- Serving Size: 1 cookie (28g)
- Calories: 120
- Sugar: 6g
- Sodium: 50mg
- Fat: 6g
- Saturated Fat: 3g
- Unsaturated Fat: 3g
- Trans Fat: 0g
- Carbohydrates: 15g
- Fiber: <1g
- Protein: <1g
- Cholesterol: 10mg