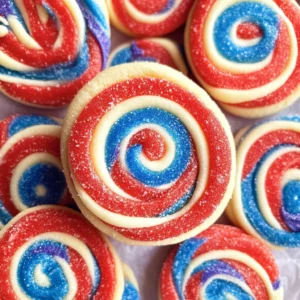
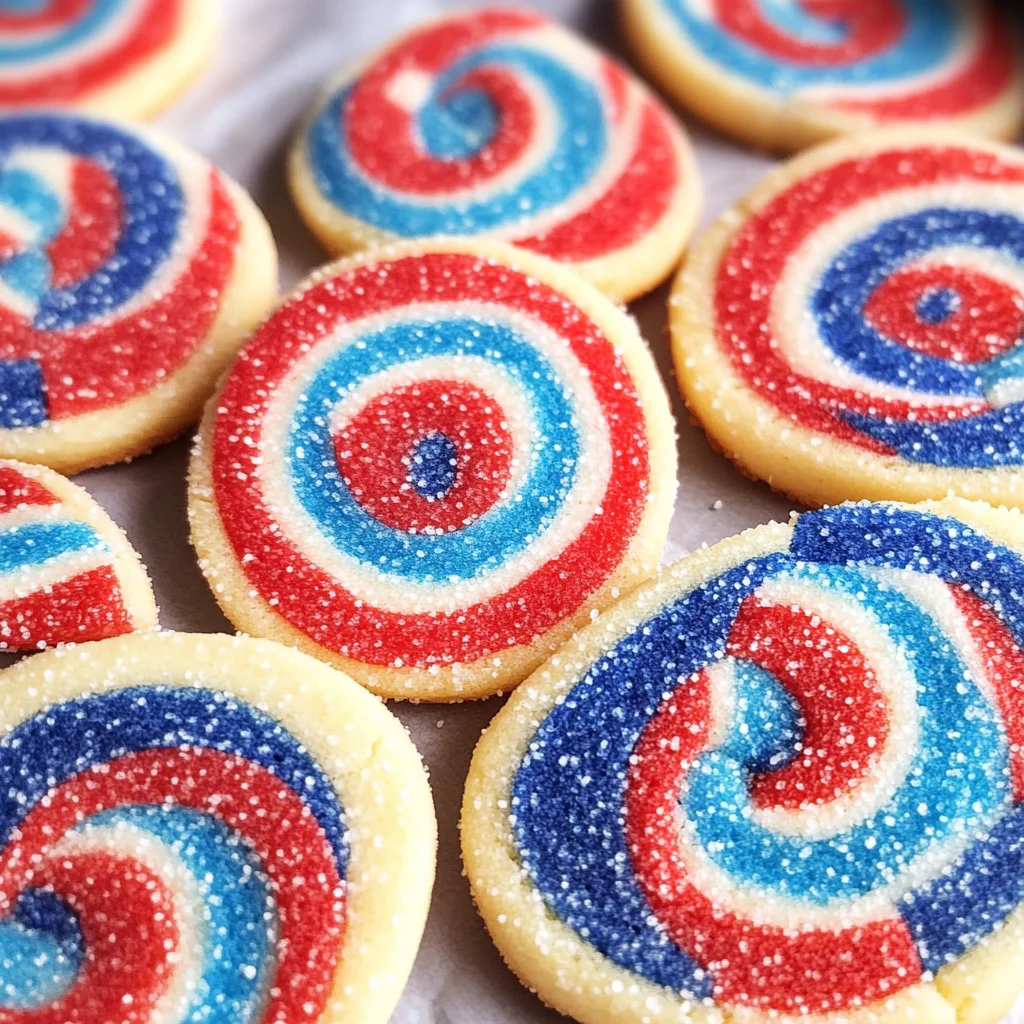
Patriotic pinwheel cookies are the perfect festive treat for your holiday gatherings. These vibrant red, white, and blue cookies not only look stunning but also offer a delightful flavor that everyone will love. Whether you’re celebrating the 4th of July or simply want to bring some color to your table, these cookies are easy to make and transport. Their unique layered design will surely impress your guests!

Jump to:
- Why You’ll Love This Recipe
- Tools and Preparation
- Essential Tools and Equipment
- Importance of Each Tool
- Ingredients
- For the Dough
- For Coloring
- How to Make Patriotic Pinwheel Cookies
- Step 1: Prepare the Dry Ingredients
- Step 2: Cream Butter and Sugar
- Step 3: Add Eggs and Vanilla
- Step 4: Combine Wet and Dry Ingredients
- Step 5: Divide and Chill Dough
- Step 6: Color Remaining Dough
- Step 7: Shape Colored Dough
- Step 8: Roll Out Dough Layers
- Step 9: Layer Dough
- Step 10: Roll Into Log
- Step 11: Chill Again
- Step 12: Preheat Oven
- Step 13: Slice Cookies
- Step 14: Bake Cookies
- How to Serve Patriotic Pinwheel Cookies
- Festive Platter
- Ice Cream Sandwiches
- Dessert Table Display
- Kid-Friendly Treats
- Party Favors
- Picnic Treats
- How to Perfect Patriotic Pinwheel Cookies
- Best Side Dishes for Patriotic Pinwheel Cookies
- Common Mistakes to Avoid
- Storage & Reheating Instructions
- Refrigerator Storage
- Freezing Patriotic Pinwheel Cookies
- Reheating Patriotic Pinwheel Cookies
- Frequently Asked Questions
- How do I achieve vibrant colors in my Patriotic Pinwheel Cookies?
- Can I make Patriotic Pinwheel Cookies ahead of time?
- What other color combinations can I use for pinwheel cookies?
- What’s the best way to store leftover Patriotic Pinwheel Cookies?
- Final Thoughts
- 📖 Recipe Card
Why You’ll Love This Recipe
- Visually Stunning: The layered colors create a beautiful presentation that makes any occasion special.
- Easy to Make: Simple steps make this recipe accessible for bakers of all skill levels.
- Perfect for Sharing: Slice them into rounds for easy serving at parties or picnics.
- Customizable Flavors: You can experiment with different food coloring to match any holiday theme.
- Deliciously Soft: These cookies have a tender texture that melts in your mouth.
Tools and Preparation
Before you start baking your patriotic pinwheel cookies, gather your tools. Having everything ready will make the process smoother and more enjoyable.
Essential Tools and Equipment
- Mixing bowls
- Whisk
- Electric mixer
- Parchment paper
- Wax paper
- Rolling pin
- Baking sheets
Importance of Each Tool
- Electric mixer: Makes creaming butter and sugar quick and easy, ensuring a light and fluffy dough.
- Parchment paper: Prevents cookies from sticking to the baking sheets, making cleanup effortless.
- Rolling pin: Helps achieve even thickness in dough layers for uniform baking.
Ingredients
For the Dough
- 1 1/2 cups all-purpose flour
- 1/4 teaspoon baking powder
- 1/4 teaspoon salt
- 1/2 cup butter (room temp (1 stick))
- 2/3 cup sugar
- 1 large egg
- 1 teaspoon vanilla extract
For Coloring
- red food coloring
- royal blue food coloring
How to Make Patriotic Pinwheel Cookies
Step 1: Prepare the Dry Ingredients
In a medium bowl, whisk together the flour, baking powder, and salt until well combined.
Step 2: Cream Butter and Sugar
In a large mixing bowl, cream together the butter and sugar using an electric mixer. Beat until the mixture is light and fluffy, which should take about 3 minutes.
Step 3: Add Eggs and Vanilla
Add the egg one at a time, beating well after each addition. Then add the vanilla extract and beat again until fully incorporated.
Step 4: Combine Wet and Dry Ingredients
Gradually add the flour mixture to the wet ingredients. Mix just until combined; do not overmix.
Step 5: Divide and Chill Dough
Remove the dough from the bowl and divide it into three equal sections. Shape one piece into a rectangle about 4×2 inches, wrap it in wax paper, and refrigerate it. This will be your white dough.
Step 6: Color Remaining Dough
Place each of the remaining two portions in separate bowls. Color one portion red and mix until evenly distributed. Do the same for the other portion with blue food coloring.
Step 7: Shape Colored Dough
Form both red and blue dough into rectangles using wax paper as guides. Refrigerate all three pieces for about 30 minutes.
Step 8: Roll Out Dough Layers
After chilling, roll out each colored dough between two pieces of wax paper into rectangles about 1/8-inch thick.
Step 9: Layer Dough
Peel off the top layer of wax paper from the red dough. Place the white dough on top of it by removing one side of its wax paper while keeping another side intact for easier transfer. Finally, add the blue layer on top in a similar manner.
Step 10: Roll Into Log
Carefully roll up all three layers tightly from one end into a log shape. Wrap it in wax paper again and stand it upright in a glass to keep its shape while chilling further.
Step 11: Chill Again
Chill in the fridge for at least four hours or freeze for about 30 minutes before baking.
Step 12: Preheat Oven
When ready to bake, preheat your oven to 350ºF (175ºC) and line two baking sheets with parchment paper.
Step 13: Slice Cookies
Remove chilled dough from fridge and slice each log carefully into rounds about 1/4-inch thick. Place them on prepared baking sheets with about two inches apart as they will expand while baking.
Step 14: Bake Cookies
Bake for approximately 9 to 11 minutes or until they are pale golden in color. Allow them to cool on trays for about 3–4 minutes before transferring them to a cooling rack.
Enjoy your delicious patriotic pinwheel cookies as they bring joy to any celebration!
How to Serve Patriotic Pinwheel Cookies
Serving Patriotic Pinwheel Cookies can elevate your holiday gatherings. These colorful treats not only look festive but also complement various occasions perfectly.
Festive Platter
- Arrange cookies on a vibrant red, white, and blue platter to highlight their colors.
- Add fresh berries or whipped cream for extra flair.
Ice Cream Sandwiches
- Pair cookies with a scoop of vanilla or strawberry ice cream.
- Press two cookies together with ice cream in the middle for a delightful treat.
Dessert Table Display
- Place cookies in individual clear bags tied with red, white, and blue ribbons.
- This adds a personal touch and makes them easy for guests to grab.
Kid-Friendly Treats
- Use smaller cookie rounds to create bite-sized versions for kids.
- Serve them alongside fun dipping sauces like chocolate or caramel.
Party Favors
- Package cookies in decorative boxes as memorable party favors.
- Include a thank-you tag to show appreciation to your guests.
Picnic Treats
- These cookies are easy to transport, making them perfect for outdoor picnics.
- Serve them with refreshing lemonade or iced tea for a complete experience.
How to Perfect Patriotic Pinwheel Cookies
Creating the perfect Patriotic Pinwheel Cookies takes a bit of finesse. Here are some tips to ensure they turn out beautifully every time.
- Chill the Dough Properly: Letting the dough chill helps it hold its shape during baking.
- Use Quality Food Coloring: High-quality food coloring ensures vibrant colors that stand out.
- Roll Evenly: Aim for uniform thickness when rolling out the dough for consistent baking results.
- Trim Edges Neatly: Trimming the edges before rolling helps create clean layers of color.
- Monitor Baking Time: Keep an eye on the cookies while baking to avoid over-browning.
- Cool Completely Before Storing: Allow cookies to cool completely before storing to maintain their texture.
Best Side Dishes for Patriotic Pinwheel Cookies
Pairing side dishes with your Patriotic Pinwheel Cookies can enhance your dessert spread. Here are some tasty options that will complement these colorful treats beautifully.
- Fruit Salad: A mix of seasonal fruits adds freshness that balances sweetness.
- Vegetable Platter: Crisp veggies with dip provide a savory contrast to the sweet cookies.
- Cheese Board: A selection of cheeses pairs nicely with the cookie’s sweetness, offering variety.
- Caprese Skewers: Fresh mozzarella, basil, and tomatoes on skewers make a light appetizer option.
- Mini Quiches: These savory bites are great for balancing out dessert flavors at any gathering.
- Pasta Salad: A light pasta salad adds heartiness and complements the festive theme well.
- Guacamole and Chips: The creamy guacamole provides a rich taste that contrasts well with cookies’ sweetness.
- Chocolate-Covered Strawberries: These elegant treats add sophistication and pair perfectly with your pinwheels.
Common Mistakes to Avoid
Making Patriotic Pinwheel Cookies can be a fun and festive activity. However, there are some common mistakes that can affect the outcome of your cookies.
- Ignoring chilling time: Failing to chill the dough can lead to cookies that spread too much while baking. Always refrigerate the dough as instructed.
- Not measuring ingredients correctly: Using too much or too little flour can alter the texture of your cookies. Use a kitchen scale or proper measuring cups for accuracy.
- Overmixing the dough: Overmixing can make cookies tough instead of soft. Mix just until combined to keep them tender.
- Skipping parchment paper: Baking directly on the pan can cause sticking and uneven cooking. Always line your baking sheets with parchment paper for best results.
- Rolling too thick: If the layers are rolled too thick, your cookies may not bake evenly. Aim for about 1/8-inch thickness for all layers.
Storage & Reheating Instructions
Refrigerator Storage
- Store in an airtight container for up to 5 days.
- Place parchment paper between layers to prevent sticking.
Freezing Patriotic Pinwheel Cookies
- Freeze unbaked logs wrapped in plastic wrap for up to 3 months.
- Baked cookies can also be frozen in an airtight container for up to 2 months.
Reheating Patriotic Pinwheel Cookies
- Oven: Preheat to 350ºF and heat cookies for about 5 minutes.
- Microwave: Heat individual cookies for about 10-15 seconds until warm.
- Stovetop: Place cookies in a skillet over low heat for a minute or two.
Frequently Asked Questions
Here are some common questions about making Patriotic Pinwheel Cookies, along with their answers.
How do I achieve vibrant colors in my Patriotic Pinwheel Cookies?
To get bright colors, use gel food coloring instead of liquid coloring. Gel colors provide more intensity without adding extra liquid.
Can I make Patriotic Pinwheel Cookies ahead of time?
Yes! You can prepare the dough and roll it into logs ahead of time. Just chill and freeze them as instructed until you’re ready to bake.
What other color combinations can I use for pinwheel cookies?
Feel free to experiment with different color combinations! Pastels or seasonal colors work well, allowing you to customize these cookies for any occasion.
What’s the best way to store leftover Patriotic Pinwheel Cookies?
Store leftover cookies in an airtight container at room temperature or refrigerate them if you prefer them chilled. They’ll remain fresh for several days!
Final Thoughts
Patriotic pinwheel cookies are not only visually appealing but also versatile in flavor and design. You can easily customize them with different colors or flavors based on your preferences. Try this recipe for your next celebration or holiday gathering; they’re sure to impress family and friends!
Did You Enjoy Making This Recipe? Please rate this recipe with ⭐⭐⭐⭐⭐ or leave a comment.
📖 Recipe Card
Print
Patriotic Pinwheel Cookies
- Total Time: 31 minutes
- Yield: 24 cookies 1x
Description
Delight your guests with festive Patriotic Pinwheel Cookies, a visually stunning treat perfect for holiday celebrations. These vibrant red, white, and blue cookies not only capture the essence of patriotism but also offer a melt-in-your-mouth experience that everyone will enjoy. Ideal for gatherings such as the 4th of July or summer picnics, these cookies are easy to prepare and transport. The unique layered design will impress friends and family alike, making them a must-have addition to your dessert table.
Ingredients
- 1 1/2 cups all-purpose flour
- 1/4 teaspoon baking powder
- 1/4 teaspoon salt
- 1/2 cup butter (room temperature)
- 2/3 cup sugar
- 1 large egg
- red food coloring
- royal blue food coloring
Instructions
- In a medium bowl, whisk together the flour, baking powder, and salt until well combined.
- In a large mixing bowl, cream together the butter and sugar using an electric mixer until light and fluffy, about 3 minutes.
- Add the egg one at a time, beating well after each addition. Then add the vanilla extract and beat again until fully incorporated.
- Gradually add the flour mixture to the wet ingredients. Mix just until combined; do not overmix.
- Remove the dough from the bowl and divide it into three equal sections. Shape one piece into a rectangle about 4×2 inches, wrap it in wax paper, and refrigerate it. This will be your white dough.
- Place each of the remaining two portions in separate bowls. Color one portion red and mix until evenly distributed. Do the same for the other portion with blue food coloring.
- Form both red and blue dough into rectangles using wax paper as guides. Refrigerate all three pieces for about 30 minutes.
- After chilling, roll out each colored dough between two pieces of wax paper into rectangles about 1/8-inch thick.
- Peel off the top layer of wax paper from the red dough. Place the white dough on top of it by removing one side of its wax paper while keeping another side intact for easier transfer. Finally, add the blue layer on top in a similar manner.
- Carefully roll up all three layers tightly from one end into a log shape. Wrap it in wax paper again and stand it upright in a glass to keep its shape while chilling further.
- Chill in the fridge for at least four hours or freeze for about 30 minutes before baking.
- When ready to bake, preheat your oven to 350ºF (175ºC) and line two baking sheets with parchment paper.
- Remove chilled dough from fridge and slice each log carefully into rounds about 1/4-inch thick. Place them on prepared baking sheets with about two inches apart.
- Bake for approximately 9 to 11 minutes or until they are pale golden in color. Allow them to cool on trays for about 3–4 minutes before transferring them to a cooling rack.
- Prep Time: 20 minutes
- Cook Time: 11 minutes
- Category: Dessert
- Method: Baking
- Cuisine: American
Nutrition
- Serving Size: 1 cookie
- Calories: 100
- Sugar: 8g
- Sodium: 50mg
- Fat: 4g
- Saturated Fat: 2.5g
- Unsaturated Fat: 1.5g
- Trans Fat: 0g
- Carbohydrates: 14g
- Fiber: 0g
- Protein: 1g
- Cholesterol: 20mg